However, I am presenting this post Free Easy Way to Transfer Your Blog from Blogger to WordPress especially for those who are attempting to switch. I have just tried to make to educate how you can successfully switch to wordpress.org. As, this post won’t convince or compel you to switch. So, lets walk through this Free Easy Way to Transfer Your Blog from Blogger to WordPress post which will literally allows you to learn step by step how to transfer from Blogger to WordPress.org easily and exponentially.
Step1: Sign up for Hosting

In the context of switching from Blogger to WordPress.org, the first step is sign up for hosting. There are several distinct hosting companies which are reliable and offers their services at very lowest and competitive prices. Moreover, they provide excellent customer services as well as there control panel is very affable and convenient to use and implement. Several companies allows you to opt a free domain name, if you haven’t purchased still yet when you go to set up your account.
Step 2: Install WordPress on your Hosting Account
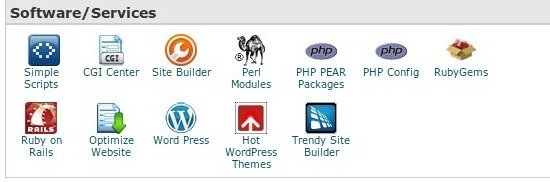
The next step comes after sign up for hosting is installing WordPress on your hosting account. It’s too very simple to perform, first log in your hosting control panel and look for the WordPress icon that might be present underneath a section like “Software/Services” or “Simplescripts Installation” as well as it might be distinct amongst distinct hosting companies. Towards make you ease, an option of live chat is always available where you can start anytime in case of need for any help. Later, when you point out the icon, go ahead and install WordPress. When your readers are watching your blog it doesn’t allows you to accomplished all changes live.
Step 3: Import to WordPress
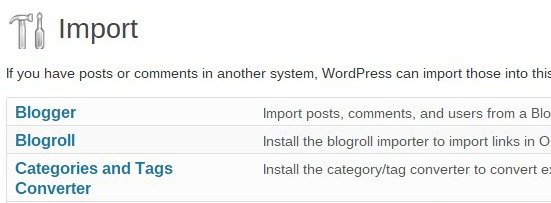
Now, in this step you will required to import posts from your Blogger account to WordPress. This is very convenient to perform, just simply log into your temporary wordpress installment through visiting http://yourtemporarydomain.com/wp-admin. Later, analyze “Tools” located in the left hand sidebar and then select “Import Posts.” Then next page will appear which will asked the type of posts you would desire to import, hence, opt for “Blogger” from option titled.
Again, you will be asked to install an “importer for Blogger”. However, to continue click the button to install the importer. Then click to activate and opt to install plugin among thousands of plugins available there. In order to finish, click to authorize WordPress to access your Blogger account and follows the steps constantly which will import your posts from your Blogger account to WordPress.
Step 4: Double Check the Content
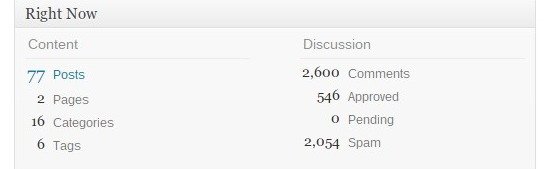
After completion of step 3 i.e. when all your posts completely transferred in WordPress. It is highly obligatory to cross check and ensure that your all posts and comments either transferred correctly or not, however, this can be achieved by counting the numbers of posts in wordpress rather than of Blogger. Above all, you will have one extra post and page concerning WordPress, as it is automatically created after the first installation as a welcome post and sample page. So you are required to delete such type of posts and pages.
Sometime, it is likely that all posts and comments not transfer properly. In such case, there might be no easy way to get all posts and comments transferred. However, if these posts are crucial contact Blogger or troubleshoot in account of Google Search otherwise it is often easier to not bother about lost posts.
Step 5: Choose and Configure a Theme
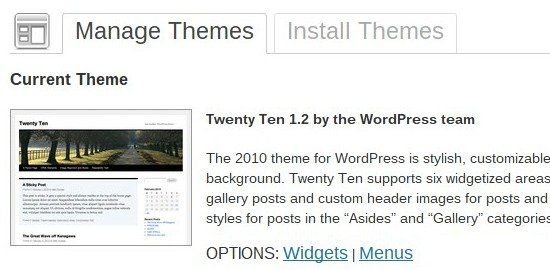
After ensuring that the content has been transferred properly, Now, its the time to spice up your wordpress design conveying an alluring look. However, it can be achieved in very easy way. Just, navigate towards “Appearance” putting up in right hand sidebar of the dashboard and select themes as well as “Install Themes” at the top of the page and go ahead with simple steps towards the same.
Moreover, you might be desire to designate a theme in order of configure to work in a manner you desired. You can retain some time to configure it in your desired look by installing widgets, plugins or adding pages.
Step 6: Change the Permalink Structure in WordPress
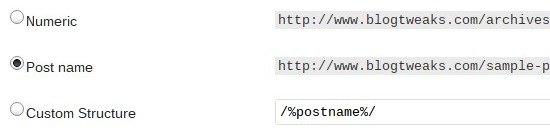
In this step you are required to modify the permalink structure. The reason behind this is that Blogger treat their permalink structure in very alter way. However, you are supposed to modify the permalink structure in WordPress to match that with Blogger in order to minimize the counting of broken links. This can be achieved by clicking on “Settings” at left hand side bar in WordPress dashboard and select “permalinks”. Some option will appear to choose as per your need and suits in radio button and Click the desired radio button accordingly. If you are opting for “custom structure” copy and paste this format /%year%/%monthnum%/%postname%.html to the right of the button.
This action will allows the permalink structure in WordPress to match with the structure on old Blogger site. However, it tends the links to work properly and shorten the number of broken links.
It won’t eliminate those broken links entirely but undoubtedly will minimize them. As, the blogger removes articles from the urls of post titles but WordPress doesn’t. Hence, you can fix this through manually changing to the broken urls in WordPress.
Step 7: Sign up for and Configure Feedburner

As, your habitat is now WordPress, you will required sign up for Feedburner which will analyze your RSS feeds and subscriptions. This is very handy and convenient, just go to Feedburner and sign up for an account. Later, follow step by step and set up your Feedburner account and burn as well.
Step 8: Change the Domain Setting

Your new WordPress site is now set up and ready to take off. Here, you are supposed to modify the settings of your temporary site i.e. on a temporary domain. However, in order to achieve the same log in your hosting panel and look for an “phpMyAdmin” labeled icon and click. Next, select “databases” to click and then the database for your WordPress Installation. Now, point out “wp option” and click to change your temporary site url to the permanent one in Line 1. Later, again designate “wp options” and replace the temporary url with the new one in line 37.
Step 9: Forward the Name Server
Now, you are at final step. Here, you are required to forward the nameservers for your name. This is very simple to accomplished. Just log into the dashboard from where you purchased your domain. Click to manage the domain and then nameservers. Here, change them with the nameserver information where your site is hosted.
However, I opined that this post Free Easy Way to Transfer Your Blog from Blogger to WordPress will be literally like by you as well as very useful for those who are planning to switch from Blogger to WordPress. So, just implement these valuable steps and create your new blogging website with WordPress which has lot of alluring and mind-blowing themes and widgets to opt among those.
Comments
0 comments