E-commerce is one of the biggest game changers in shopping in recent time. Online shopping has caused a large number of malls in the United States to close down because of the convenience that online shopping gives. Buyers don’t have to step into a store to make a purchase. They just need to go to Amazon, look for what they are looking to buy, and they’ll receive their item as soon as possible. Online shopping is so powerful that it’s expected to go over $638 billion in revenue by 2022. So it’s about time you ride on the train of e-commerce.
One of the most important aspects of e-commerce is the photo of your product. A bad e-commerce photo may cause the reader to turn away and move to a different item.
Here are several ways to create high-quality e-commerce photos on a budget:
Use The Right Camera
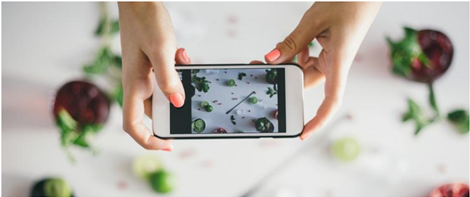
Let’s face it. DSLR cameras are the popular choice for capturing high-quality photos. When you sell your products on e-commerce sites, you don’t have to worry about using a fancy camera. The camera in your hand is more powerful than you think. Companies such as Apple and Samsung regularly release smartphones that produce stunning, and high-quality images. The smartphones are more than capable for you to take your shot. Smartphones aren’t just an affordable option. Using a smartphone is a lot easier for the users. When you use a DSLR camera, you have to fix a lot of settings that may become cumbersome if you simply want to shoot a photo for your e-commerce store. Your smartphone, on the other hand, only needs a few taps to focus and make sure the lighting is adjusted for the photo.
Set a Background
When you think of the background, the first thing that probably came to your mind is the large white sheet that you can unfurl inside a photography studio.
White backgrounds are commonly used in photos because the color does not clash with other colors.
There are different kinds of backgrounds available for photographers:
- Canvas: ideal for studio photography, versatile and long-lasting, made of heavy material, wrinkles during transportation, costs around $150 to $200.
- Muslin: easy to assemble and place over different surfaces, steep price range averaging $2000.
- Velour: ideal for theater and stage performances, has to be regularly cleaned as it picks up dirt and dust easily.
Canvas is already a costly purchase. Spending a large amount of money on a backdrop isn’t necessary for your e-commerce photos. You can find your ideal backdrop at home. The expensive backdrop can be used in the future but, you don’t need it right now.
The chair is the perfect alternative to the expensive backdrop. Your chair won’t cost a fortune to purchase and you can move the chair around to find the ideal shooting angle. All you need is a chair. Yes, a chair. You probably think this is a joke, but a chair will be the place where your craft paper will roll down. You can use clothes pins as a way to keep the craft paper from moving on the chair.
If you don’t have a chair, just paste the craft paper on the wall and let it drape to the ground for an instant backdrop for a fraction of the cost of an actual backdrop.
Adjust The Lighting
There are several ways to shoot your product with the help of light. You can opt for the natural light or go with artificial light. Artificial lights such as studio lights help photographers practice product angles. Studio lights can become very expensive and difficult to set up.
Natural light gives you a limited photo shooting time because it relies on the natural shift from day to night. Natural light is any form of light that comes from the sun. There are many kinds of natural light such as hard, soft, reflected, window, and more. However, natural light is beneficial to the photographer because they get to know the best lighting for their products. And best of all, it’s FREE.
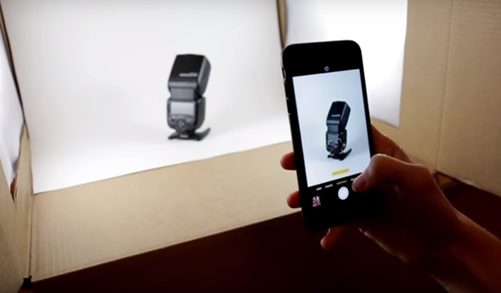
Another alternative is professional light boxes. These cost an arm and a leg, but plastic storage boxes are an affordable alternative compared to a professional lightbox. Lightboxes are basically plastic boxes that light up. Plastic Storage boxes are the same as light boxes except, they don’t have a built-in light inside. You can find plastic boxes at any store that sells storage tools.
Look for a plastic storage box that you can place on its side with the lid removed.
Once you have found a box, the next step is to tape white paper on the bottom of the box as a way to diffuse light. Placing the white paper on the bottom of the box minimizes the shadows that will appear in the photo. If your budget permits, add an artificial light inside the box. You can also play with natural light by placing the box near daylight.
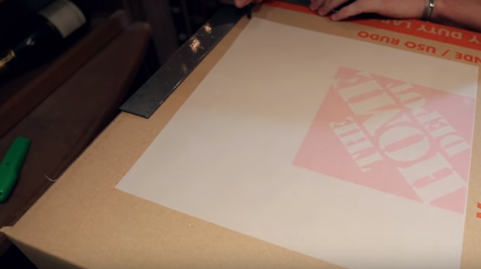
You can also use a paper box.
- Any old paper box at home will do
- Two Sheets of Wax or Baking Paper
- One Sheet of White Paper
- Tape and a Utility Knife
- OPTIONAL: Desk Lamp. A small desk lamp will do. Go to your nearest hardware store and find the cheapest desk lamp or use a lamp you already have at home.
Now that we have our items, it’s time to make the box.
- Find the side of the box that makes a good opening for you to place your object.
- Cut the chosen side in half.
- Leave the two flaps in place so they can act as doors for the front of your box. The flaps will act as barn doors that will help control how much light gets inside the box.
- Measure the sides of the box and cut wax paper that will match the sides.
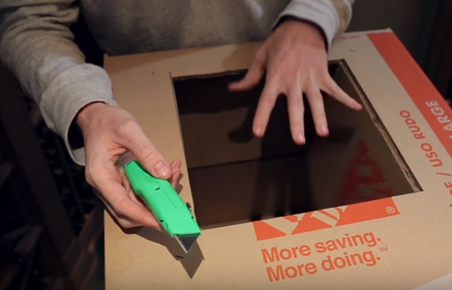
- Cut the squares to create a space for the wax paper.
- Tape the wax paper to the open squares
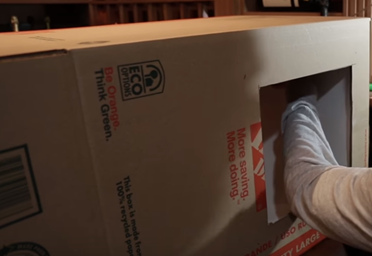
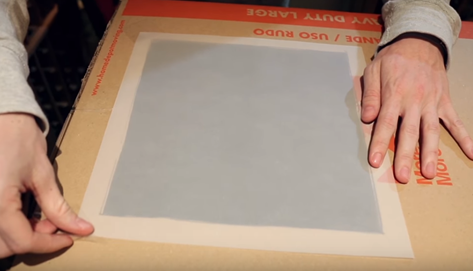
- Place the sheet of paper inside the box and use it as a background.
- Make sure the surface of the box is flat before placing the sheet of paper for shooting. After you have checked the surface, place the sheet inside in order to be used as a backdrop. Place your item inside the box with the sheet of paper already placed inside. It’s time to shoot!
Shooting The Product
Depending on the studio or the location, lighting options may differ. Before you shoot the product, bear in mind what time of day it is to determine if you should use natural light or artificial light. Artificial light does not always put the product in the best “light.” Natural light is preferred because it displays more color than artificial light. Using artificial light is costly so you’ll be investing a lot of money into your photos. We don’t want that because we’re trying to stay on a small budget.
Another aspect of shooting that we want to look at is the angle of our shots. There are four types of shots that give viewers the best angles of a product.
Top View:
The bird-eye view. You stand over the product and capture the image. You’re giving the impression that you are looking down at the product.
Eye-Level:
The most common way that products are captured is at eye level. You see the product straight-on and you get an accurate perspective of the product’s size.
45 Degree Angle
The artistic approach. Using a 45-degree angle isn’t very common but, it gives the viewer an accurate idea of how they will see the product in everyday life.
Macro:
Macro can be described as the close-up. If you want to feature specific details of your product, this is the best angle to choose because your product is given more importance over the items in the background.
The last item you need for the shooting is the tripod. Tripods are useful for taking steady shots. You can find tripods that hold smartphones for a dollar online. Using your hands for support won’t be enough to give you the best image all the time. If you don’t have a tripod, you can try stacking books on top of each to act as your base. Place your camera on top and start shooting. Bear in mind that you’ll be using a smartphone so, be careful shooting with a stack of books as support.
Clean Up with Free Photo Editing Software,
Now that your images have been shot, you want to make sure that the images are clean and ready for upload. There will be pictures that don’t look the way you intended them to be due to several factors. Your images may absorb light differently resulting in an image with a lot of shadows or the colors of the object don’t stand out the way they are supposed to. The human eye sees things differently compared to a camera. Using photo editing software can help you capture the ideal image that will showcase your product.
There are several options to clean-up your images. Paper Boat Creative, a post-production agency that offers e-commerce photo editing services, provides a number of tutorials and lessons on retouching photos. Other websites and blogs offer lessons and tutorials for you to utilize retouching using free photo editing software. Here are a number of free photo retouching tools that you may use:
-
- PIXLR: When it comes to photo editing for e-commerce, you should consider using PIXLR. The tools give you a vast array of brushes, masks, filters and other advanced photo editing tools. You can even connect the program to your Facebook account if you choose to do so.
 The software allows you to edit your photos with a single click or you can also choose the long way in order to achieve your desired look. The only issue that PIXLR would have is that the program is not friendly for beginners and has a steep learning curve.
- GIMP: GIMP is a powerful free alternative to Photoshop. Don’t be fooled by the program’s interface. The interface of GIMP bears a close resemblance to Adobe Photoshop. GIMP can support many kinds of images and has a vast array of editing tools.
 The fact that GIMP closely resembles Photoshop helps the users become more familiarized with the software. GIMP is open ware which means it’s a type of software that anyone can edit. A large number of users helps keeps the software up-to-date. GIMP’s only issue is the fact that it has a clumsy interface.
 - Paint.net: If you find the previous options a little too advanced for your liking, you can use Paint.net. The program has a vast array of tools to create special effects and even help you create photos for your product’s Instagram feed.
 The only issue with Paint.net is that you have to install different plugins to maximize its usage. Paint.net’s raw version (without plugins) can do a lot of things as is but, plugins are required for you to take advantage of the program.
 The fact that GIMP closely resembles Photoshop helps the users become more familiarized with the software. GIMP is open ware which means it’s a type of software that anyone can edit. A large number of users helps keeps the software up-to-date. GIMP’s only issue is the fact that it has a clumsy interface.
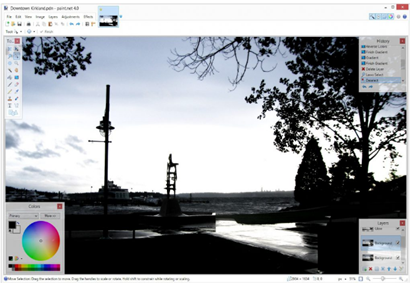 The only issue with Paint.net is that you have to install different plugins to maximize its usage. Paint.net’s raw version (without plugins) can do a lot of things as is but, plugins are required for you to take advantage of the program.
Money Well Spent on E-commerce Photography
With these budget-friendly tips, you can cut down your e-commerce photography spending at the fraction of the cost. Think of your e-commerce photos like they’re food. The best food does not always need an expensive price tag. Sometimes, the best food may be found on a budget. Shooting e-commerce photos may be described in the same way. You don’t need a large budget to shoot your ideal photos. All you need are a few tools that may be available at home or a quick trip at the store and will cost a fraction of the total cost of professional equipment. With these tips, getting the ideal e-commerce photos do not have to cost you an arm and a leg.
Author Bio:
Rebecca Van Ommen is the Executive Creative Director of The Paper Boat Creative, a creative agency that specializes in high-end photo retouching, photo editing, and more. She was one of the youngest Art Directors for Getty Images in London. Her work has been published through some of the world’s largest advertising agencies including Mother, AKQA and BBDO London. Rebecca loves to exercise in her spare time. She also enjoys bringing her daughter to photo shoots for inspiration
Comments
0 comments