If you are a blogger then cheer up! I am going to provide a great news for you. As you would be acquainted that how much SEO is earnest for any Blog or Website. Earlier Blogger didn’t supported SEO, but now it is completely functional and affable to implement.
You will be glad to know that recently Blogger unveiled a novice SEO friendly “Search Preference” option. Verily, this is an elegant option for blogs on the platform of Blogger as well as for those who desires to own a SEO friendly blogging platform where they can implement useful Search Engine Optimization methods which eventually results in dragging your blog site at top in search engine rank page and thus drive more traffic to your blog. However, Blogger has incorporated following:
- Customize Robots.txt
- Meta Tags
- Alt tags for Images
- Redirects
- Customize 404 Error Page option
- Custom Robots Header Tags
- Search Meta Description
However, it allows you to define asunder Meta Description and Robots Tags for each and every single blog post. Now, let me take you through the tutorial that will say about how you can implement these Search Engine Optimization friendly options to your blog in easy way as well as take advantages.
Enable the Search Engine Option
This novice SEO optimization works only with new Dashboard of Blogger UI. In context of authorize the access to the options first of all you are required to go to New Blogger Dashboard then select the Blog. Later click over Setting Tab and then Search Preference
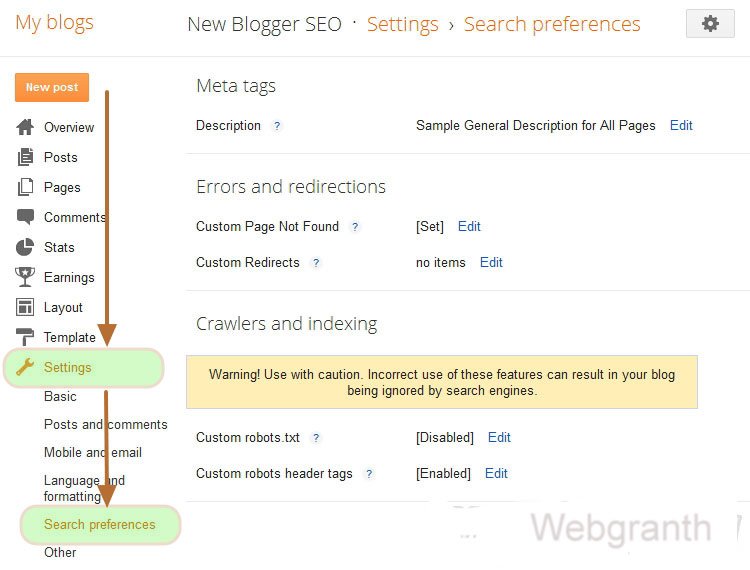
Search Description
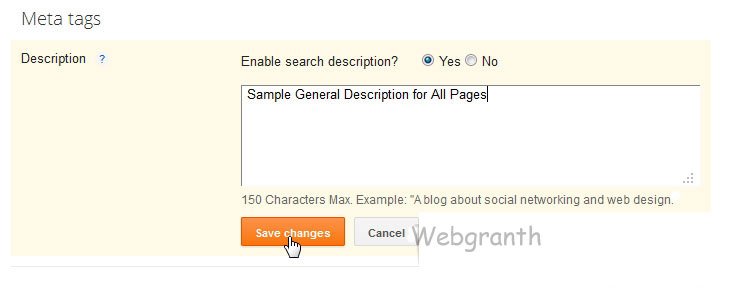
It is the common description defined to Home Page in order to SEO optimization for Blog or homepage as well as this Description appears in Search Results page. However, Search Description should comprise not more than 150 characters in length and it should be relevant to the subject of your Blog.
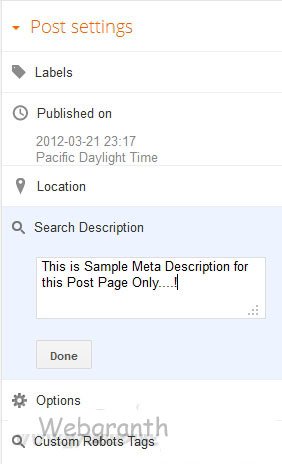
Custom Post Meta Description
This is the Custom Post Meta Description for each and every post. In the midst of creating or editing a post area it enables you to define and customize each description of an individual post. In order to set a Custom Post Meta Description for your blog, Click to Search Description which is located under the post setting that sits at right side of creating/editing post. You are supposed to include a small description for your blog post. As it has not any limitation regarding characters, but Google used to crawl only around first 160 characters. That’s why it is suggested that here you should keep the description as short as possible.
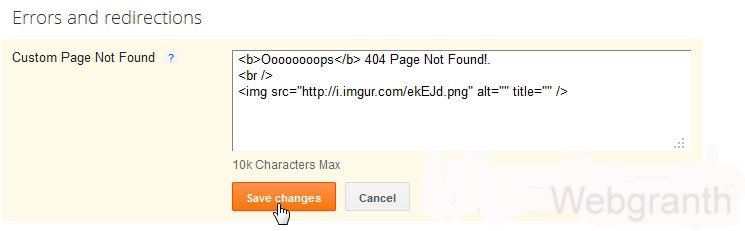
Custom 404 Error Page
Undoubtedly, you must have seen 404 error message over internet while attempting to reach a specific page including this:
“Bye bye!! Blogger Default Error/404 Not Found Page”
“Blogger Providing the Custom Error/404 Not Found Page. Generally This Error or 404 message appears in Blogger Status Message Bar.
However, as the 404 error message indicates that the client is able to intimate with server, but what the request has been made the server couldn’t find it. Thus in bottom line this message appear when visitors/users try to achieve a broken or dead link. Therefore, with this new search preference option of SEO Blogger you can incorporate your blog with Error/404 message in account of HTML tags as well as Images also.
Preview

Redirects
Redirects is another great advantage of this new option in Blogger. This option is highly significant and worthy to redirect a page to another. In web-developer standpoint, when you redirect a URL link of a webpage to another (URL Link of another web page), the visitors/users will achieve the webpage of the redirected URL link not that true page which the user seek. It is very affable to implement this option and Redirected a webpage. The Redirection is considered as a temporary redirection which is sent through HTTP Headers.

HTTP Headers Location Redirection

Custom “Robots.txt”
Beyond all of these you will be pleased to know that Blogger is now offering a complete liberty to customize and edit robots.txt file which is called as the key file for Search Engine Robots. However, in account of robots.txt you can block or allow the search engine Robots to index or crawl the webpage. Generally, almost every website accompanied with robots.txt which can be accessed by employing a URL like http://yourblogname.blogspot.com/robots.txt
As for example you can view the robots.txt file for Webgranth is https://www.webgranth.com/robots.txt

In order to customize the robots.txt file, you would required to visit the page http://www.robotstxt.org/robots.txt where you would get a complete overview on robots.txt. Also, you will have to be careful while editing the robots.txt file.

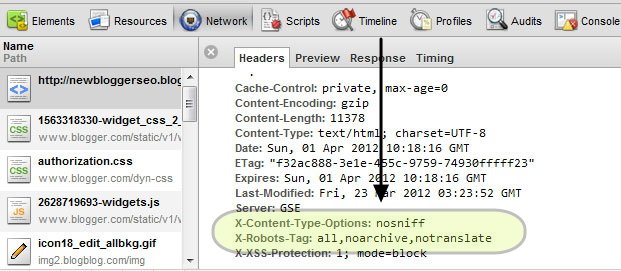
Custom Robots Header Tag
With this Robot tags you can control the Search Engine Robots brilliantly. Basically such kind of tags are either define in (X)HTML Pages or sent by HTTP Headers in context of blocking or allowing the Robots. But, when the matter comes with Blogger it is sent via HTTP header.
HTTP Header Robots Tag

Blogger allows you to set the Robots tags with Homepage, Post pages, Label/Archive Pages in Search Preference tab on Crawlers and indexing.
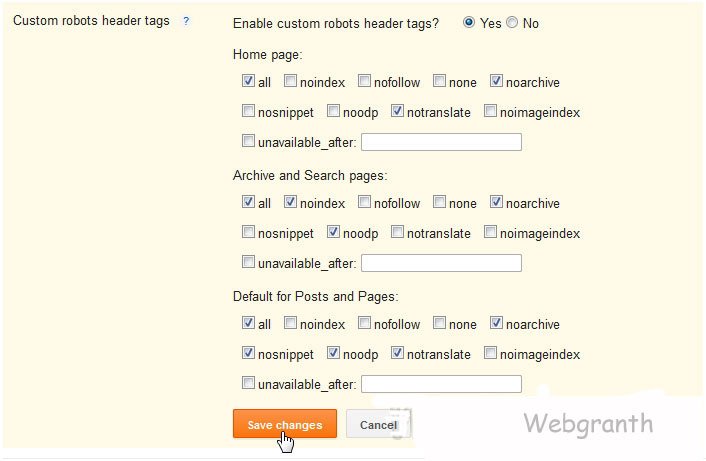
Custom Robots Header Tags for Individual Posts
These are quite obvious and earnest for setting up a custom robots header tags for each and every post. These are also delivered in account of HTTP Header. Moreover, it also facilitate you to customize in mean time when you are creating or editing the post.
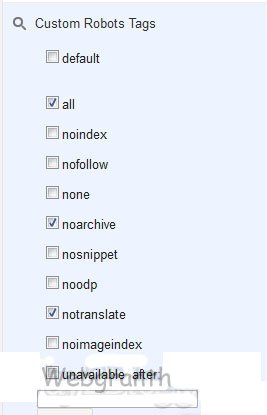
Now, at this point let me define the custom robots header tags.
all: It says that there is no any restrictions has been defined towards serving or indexing.
noindex: It checks the page to appear in search result as well as don’t display a “Cached” link.
nofollow: It check the crawlers or spiders to follow the links on that specific page.
none: It is equilateral to nofollow and noindex
noarchive: It doesn’t allow “Cached” link to appear in search results.
nosnippet: In search result of a specific page snippet becomes hidden.
noodp: This check us to employ metadata from Open Directory Project concerning snippets and titles which appears for the page.
notranslate: It protects the translation of a page in search result.
noimageindex: It doesn’t allow images to index by crawlers on the page.
unavailable_after: [RFC-850 date/time]: This is useful to check a page to appear in search result after the specific time and date. In this case, the date & time must be in RFC 850 format.
Alt and Title Tags for Images
The Alt and Title Tags for images are quite worthy for indexing the images. In account of this Google Image Bots including other distinct image bots, your image can be indexed easily through Alt and Title Tags. Thus, take a look over this procedural through which you can define the Alt and Title tags for images.
Step-1: First of all in Post Editor upload or add the images
Step-2: Next click on that image for which you wish to set the Alt and Title tags.
Step-3: Then, either above or below the image a small menu will appear where you are required to opt Properties Option.
Step-4: Finally, a Popup prompt will appear where you can assign the Title and Alt tags for the image.