In context of storing data it employ Entity Attribute Value (EAV) database model and comprises an large extent of community that grows very exponentially. Undoubtedly, Magento is very user-friendly and easy to implement and allows for both multiple stores and store fronts.
However, if you desire to setting-up a Magento e-commerce website without any hassles and minimize the hindrances at the lowest as possible, you must opt to go with. In context of rendering your e-commerce website more user-friendly and increase its usability, I am going to present some most useful tips that will be highly obvious to convey an enhanced user-experience as well as beat the competence in account of enhanced business strategies. It is quiet simple and convenient for installation and global configuration and the mean time give up distinct hindrances too.
This post Must Follow Magento Tips for Enhanced Magento Experience would not only make you acquainted with impressive tips of Magento but also lets you to enrich your e-commerce website in very captivating manner, allowing visitors/customers to avail an amusing experience like never before. These significant Magento Tips are also capable to solve many complexities and issues you might meet in setting up your e-commerce website. In account of these useful Magento Tips even those who have little knowledge about Magento can accomplish and implement these easy to implement Magento Tips.
Now, let me take you through this useful post Must Follow Magento Tips for Enhanced Magento Experience which incorporates some most useful Magento Tips regarding How to add a Twitter feed in Magento, Outside Magento perform Admin Function, Disable Products Through the Database, Extending Simple Configurable Products Extension for Magento, Move a Magento Database to a New Server.
How to add a Twitter feed in Magento
Almost every Magento users would be acquainted that no any default option is available for Twitter feed in Magento. So, if you are verily eager to embellish your site with twitter feed, then only one alternative is present. Yes, you can create this manually. So, follow the instructions of including Twitter feed in Magento listed below.
Step 1
Visit the site http://twitter.com/about/resources/widgets/widget_profile and add your Twitter Username there. After completing, designate Finish button and click. Don’t forget to grab the code. This script code will create a copy of this.
Step 2
In this step, for your Twitter feed you are required to create a static block. Open the Magento Admin panel:
Go>CMS>Static block>add new block
Name : Twitter
ID : Twitter
Status : enabled
Step 3
If you have desire of Twitter feed to appear in homepage of the side, a little bit of efforts of copying and pasting the below listed code in CMS>Page>Homepage>Content is required.
Code
{{block type="cms/block" block_id="twitter"}}
In the same context, you are supposed to call a static block in sidebar.
For left sidebar: app/design/frontend/default/yourtheme/layout/catalog.xml
<reference name=”left”>
<block type="cms/block"> <actionmethod="setBlockId"><block_id>twitter</block_id></action></block>
</reference>
Outside Magento perform Admin Function
Some of Magento users may wish to employ a script or delete a product or perform another ‘admin only’ from outside of the Magento Installation. However, you are supposed to implement following instructions that will surely boot up Magento for you to start in account of.
require_once('app/Mage.php'); //Path to Magento
umask(0);
Mage:app();
In context of deleting a product, generally you are required to do following:
$product = Mage::getModel('catalog/product')->load($id);
$product->delete();
However, it might be possible to encounter following message with some versions of Magento.
Fatal Error: Uncaught exception ‘Mage_Core_Exception’ incorporating the message ‘Cannot complete this operation from non-admin area’.
Which convey the meaning that some function within Magento arsenal can be only accomplished through the admin panel of the website. Therefore, you are required to change in order to accomplish this outside of Magento.
// Mage:app();
 // To
 Mage::app("default")->setCurrentStore(Mage_Core_Model_App::ADMIN_STORE_ID);
Performing these steps will of course boot the admin panel of your Magento e-commerce website.
Disable Products Through the Database
Anytime, you may feel the necessity to delete any product from the database of your Magento e-commerce site or developments for some reason. As, Magento’s database structure is not exactly affable and may put some hindrances in front of you towards achieving this task. However, I am here to help you, so you don’t have to worry anymore.
First of all, you are supposed to browse catalog_product_entity and designate the id of the product(s), you wish to change through SKU. Now, write down the entity_id’s once you locate.
Next, go to catalog_product_entity_int and make changes to any rows having the entity_id with attribute_id 84 (which is the status) to a value of 2 for disabled. Just for instances, 0 = unselected, 1 = enabled and 2 = disabled.
Extending Simple Configurable Products Extension for Magento
Almost most of the Magento users recommend this great tool of Simple Configurable Products Extension for Magento. However, these Simple Configurable Products Extension are very easy and affable to implement as well as updates the images and prices where necessary. So, are you literally wish and desire to add, then go ahead and go through these steps.
File One: OrganicInternet/SimpleConfigurableProducts/Catalog/Block/Product/View/Type/Configurable.php
Line 13 is about a foreach statement. Step inside this and down to the first if statement – it will involve with something along the lines of Mage::getStoreConfig(‘SCP_options/product_page/change_name’) , like below:
foreach ($this->getAllowProducts() as $product) {
 $productId = $product->getId();
 $childProducts[$productId] = array(
 "price" => $this->_registerJsPrice($this->_convertPrice($product->getPrice())),
 "finalPrice" => $this->_registerJsPrice($this->_convertPrice($product->getFinalPrice()))
 );
if (Mage::getStoreConfig('SCP_options/product_page/change_name')) {

$childProducts[$productId]["productName"] = $product->getName();
}
}
Now, add in the magic – transform the word “saving” below to whatever the attribute is called and paste it in.
if (Mage::getStoreConfig('SCP_options/product_page/change_saving')) {
 $childProducts[$productId]["saving"] = Mage::helper('core')->currency($product->getSaving(),true,false);
 }
Then, furthermore, the $config variables are declared – they start at around Line 76. I added after $config[‘shortDescription’] = $this->getProduct()->getShortDescription();:
$config['saving'] = $this->getProduct()->getSaving();
Now, you are supposed to Save the file and Upload it.
Next, File Two: OrganicInternet/SimpleConfigurableProducts/etc/system.xml
Here, the users are allowed to change whether or not the new fields that can be set to Yes or No in the admin.
<label>Dynamically update displayed savings</label>
 select
 adminhtml/system_config_source_yesno
6
67
7
1
Takes affect once all configurable options have been selected
Now, to finish Save and Upload. Moreover, you can also edit the setting of other Simple Configurable options (name, image, description etc.)
Move a Magento Database to a New Server
In the context of moving Magento database to a new server, there are two things that must be always in mind. However, this Magento Tips is relevant with Magento 1.5, but might be work with later versions.
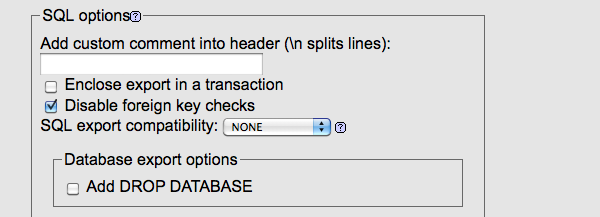
1. Disable Foreign key Checks
As, Magento is developed by employing EAV structure, and still is a relational database as well as its tables depends entirely on the existence of foreign key. When foreign key checks are too stiff , you can meet various hindrances in importing and exporting database. In most of the cases a required foreign key with table may not come in existence whereas the parts of the query is transferred.
In most of the database management system including in phpMyAdmin you can disable foreign key checks in order to prevent the constraints from the query. However, you are required to check “Disable foreign key check’ while attempting to export.
2. Reset Store & Website IDs
After importing the database you would required to run this query so that access to the admin panel could be established. Next, you are supposed to set 0 for the store and website IDs that might be lost in the midst of export and import. Open PhpMyAdmin and run the following query in your database:
SET FOREIGN_KEY_CHECKS=0;
UPDATE `core_store` SET store_id = 0 WHERE code='admin';
UPDATE `core_store_group` SET group_id = 0 WHERE name='Default';
UPDATE `core_website` SET website_id = 0 WHERE code='admin';
UPDATE `customer_group` SET customer_group_id = 0 WHERE customer_group_code='NOT LOGGED IN';
SET FOREIGN_KEY_CHECKS=1;
However, hopefully this post Must Follow Magento Tips for Enhanced Magento Experience will definitely make you pleased and lets you to enrich your e-commerce website as well as elevate its usability without any hassles. Most probably, it would also beneficial to them who have no knowledge or little knowledge about Magento.