In this recent era of online presence, almost everyone is cantering to ensure his online presence as well as reach under the arm of huge extent of people. Apart of social media sites, one robust method is sporting in the currency. Yes, I am talking about Blogger. Verily, Blogger is an elegant blogging platform and is so easy and affable to access that can be employed by almost anybody. This is a perfect platform for bloggers who still doesn’t own their website and has passion of writing and willing to share opinions, thoughts etc. However, not only individuals and bloggers but various business oriented organizations from huge corporate companies to small scale business firm has put Blogger on priority to promote and advertise their products and services. However, today I am going to make you educate about how to setup FeedBurner on Blogger.
Hopefully, you must be acquainted regarding FeedBurner, what is this? If you don’t know. No matter let me tell you. FeedBurner is considered as robust tools which makes your subscriber regularly updated whenever you publish any new post automatically incorporating a direct link. In addition, the subscribers can also employ e-mail subscription by means of that they will receive e-mail notification concerning every update of your blog website.
Now, you are supposed to go through this tutorial post Tutorial to Setup FeedBurner on Blogger and take a look over the entire procedure with snapshot how you can setup FeedBurner to your blogger website.
Step 1: Setup a FeedBurner Account
FeedBurner’s free RSS service in very robust and earnest. Prior to initiating the setup you are required to have a Google account. If you have, it’s good otherwise create a Google account and sign-up with FeedBurner. You can procure the setup in very easy way. Beyond this, you can get distinct valuable data including the most popular posts and many other RSS feed statistics.
Step 2: Create Your Feed
When setting up your FeedBurner account the main fragment of information you will have to provide is the blog feed URL in original. Once done, all blogs from your blogger site will be automatically installed with a feed. Your feed URL is seems to appear like this:
http://yourblognamehere.blogger.com/feeds/posts/default
http://yourblognamehere.blogspot.com/feeds/posts/default
Moreover, you don’t have to pet any worry or required to evaluate the fee URL as FeedBurner has capability to discover automatically. Only you have to input your Blogger URL on FeedBurner’s homepage which tends to discover all concerning posts of the Blog URL provided automatically. In the case if it locate more than one post it will list them accordingly so you are supposed to designate the blog you like to setup.

Just for having fun and bonus point you may put the URL in your internet browser. See whats appear. These are the raw text and images retrieved from your blog posts.
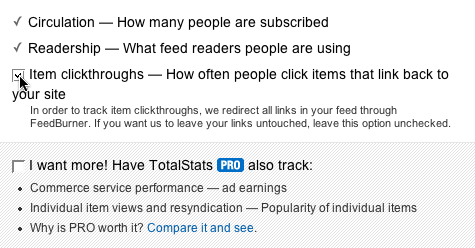
Now, go ahead with setup wizard and eventually a configuration page will appear. Here, you might want to check some additional achievements including “track item clickthroughs” and “FeedBurner Pro” box. To avail this benefit, they used to charge $4.95 per month, but since the Google acquired them, it is absolutely free to take advantage of this.
Its almost done. Click to Next button and end the setup process then you will be taken to feed management interface. Now, you are ready to implement FeedBurner feed to your Blogger site.
Step 3: Point Your Blogger Feed to FeedBurner
When you successfully get the setup on FeedBurner for your account, you are required to ensure that your FeedBurner is receiving all feed traffic for your blog. However, it guarantees the statistics getting for your blog post is more accurate.
The first step you are supposed to accomplish is to have the URL of newly created feed. After setting up your FeedBurner account, you will be asked for a name of your fist feed. For instance, the feed on webgranth will appear like this:
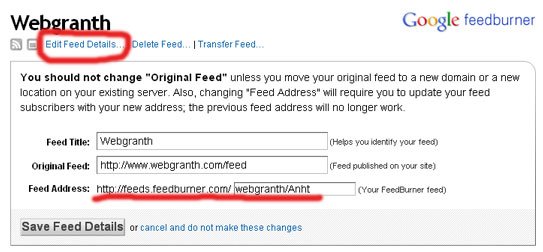
When you will click over “edit feed details”, this screen will appear. The option marked in red color is noticeable. That is the FeedBurner URL you are required to preserve.
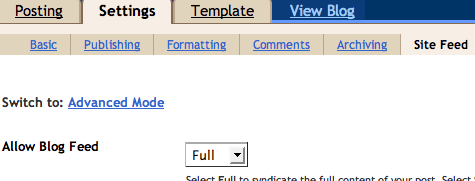
Next, go ahead to log into your Blogger account and navigate on “Setting” > “Site Feed” tab.
Now, scroll down and designate “Post Feed Redirect URL” text box and input the Feed URL of FeedBurner you save earlier, which will look something like this.
http://feeds.feedburner.com/webgranth
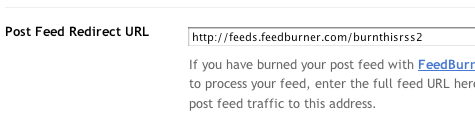
Ensure that you have entered the feed address incorporating “http://” fragment, otherwise it may lead variuos issues later. Next, Click “Save Settings” and wait for the returning message i.e. “Settings were Saved Successfully”. Now, the Blogger will redirect all your feed traffic through FeedBurner feed for your blog.
Step 4: Promote Your FeedBurner Feed on Your Blog
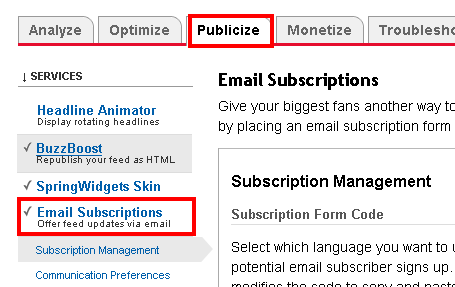
After getting the everything set appropriately, you are now supposed to promote it through incorporating attractive RSS buttons in your blog. Further, navigate to your FeedBurner account and click on “Publicize” tab.

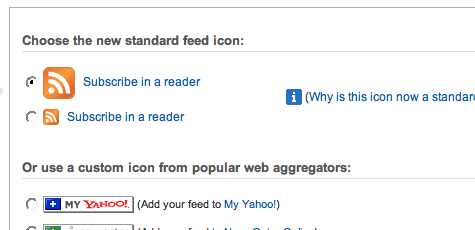
Then designate “chicklet chooser” in the left side and opt one icon you wish to sit on your blog.
Further, you are required to scroll down towards bottom of the page and click on “drop-down”. Now you should select “Blogger” to include chicklet to your blog as RSS feed widget.

When you will click “Go” button, Blogger will carry a new window in front of you to follow the prompts to continue the new widget.
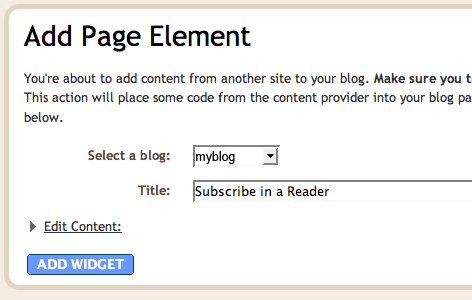
After clicking “Add Widget”, you will be migrated to your Blogger page elements layout where you can easily enrich your new FeedBurner widget at desired location. Now, you have done it. A cool and attractive RSS feed icon opens its eyes in your blog enabling users to subscribe your blog. Do remember your login and password that will be required to check your FeedBurner statistics. It also helps as well as inspires you to write about in the future.
Setting Up the Subscribe Via Email Option
Not everyone is too much familiar with RSS, but many among us are found to be flexible with e-mail subscription so why not to provide both option? Within FeedBurner e-mail option is not switched on by default. However, towards this direction you are required to click over “Publicize” tab and then “Email Subscriptions”. Now, scroll down towards the bottom of page and click “activate” button to make it on.
This function is not going to incorporate anything to your blog, but simply it activate this feature to utilize the feature of email subscription option. Further, you are required to copy the email box code and put it in your site.